Oil change guide provides a comprehensive, step-by-step approach to maintaining your vehicle’s engine health. Neglecting regular oil changes can lead to costly repairs down the road, and this guide equips you with the knowledge and skills to perform the task efficiently and safely. Understanding the importance of proper oil selection, preparation, and disposal is key to maximizing your vehicle’s lifespan.
This guide delves into everything from choosing the right motor oil for your vehicle to safely disposing of used oil. We’ll cover essential tools, safety precautions, and troubleshooting common issues. Follow these detailed instructions and ensure your vehicle is running smoothly for years to come.
Introduction to Oil Changes
Regular oil changes are crucial for maintaining optimal engine performance and longevity. Proper lubrication prevents friction and wear on internal engine components, ensuring smoother operation and reducing the risk of costly repairs. Failing to adhere to recommended service intervals can lead to significant problems down the line.Neglecting oil changes can result in a host of serious issues, including premature engine wear, decreased fuel efficiency, and even engine failure.
The oil acts as a vital protective layer, shielding engine parts from harmful contaminants and extreme temperatures. Without regular oil changes, these contaminants accumulate, causing accelerated deterioration and damage.
Importance of Regular Oil Changes
Regular oil changes are essential for maintaining engine health. They help remove contaminants and ensure proper lubrication, preventing friction and wear on engine parts. This, in turn, improves fuel efficiency, reduces emissions, and extends the lifespan of the engine. Failure to adhere to recommended service intervals can lead to serious engine damage and costly repairs.
Consequences of Neglecting Oil Changes
Neglecting oil changes can lead to significant engine problems. Accumulated contaminants can cause excessive friction, leading to premature wear and tear on engine components. This can result in reduced engine performance, decreased fuel efficiency, and increased emissions. In severe cases, neglected oil changes can cause engine failure, requiring expensive repairs or replacements. Examples include damaged bearings, piston rings, and even cracked engine blocks.
Common Reasons for Delayed Oil Changes
People sometimes delay oil changes due to various factors. Budget constraints, lack of awareness about the importance of regular maintenance, and scheduling conflicts can all contribute to the delay. Some drivers might believe their vehicles are running fine, ignoring the long-term implications of neglected maintenance. Convenience and perceived lack of urgency are also common contributing factors.
Comparison of Motor Oil Types
Choosing the right motor oil is crucial for engine performance. The table below compares conventional and synthetic motor oils, highlighting their key differences.
| Feature | Conventional Oil | Synthetic Oil |
|---|---|---|
| Cost | Generally lower | Generally higher |
| Viscosity | Thins out more quickly with temperature changes | Maintains consistent viscosity over a wider temperature range |
| Additives | Typically contains fewer additives | Often contains more advanced additives |
| Performance | Suitable for most engines, but may not offer the same level of protection as synthetic | Provides superior protection and performance, especially in extreme temperatures and high-performance applications |
| Durability | Typically lasts for shorter periods | Generally lasts longer |
Choosing the right oil type depends on factors like engine type, driving conditions, and budget. Consult your vehicle’s owner’s manual for specific recommendations.
Choosing the Right Oil

Selecting the correct motor oil is crucial for optimal engine performance and longevity. The right viscosity and specifications tailored to your vehicle’s make, model, and operating conditions are essential for protecting the engine’s internal components. Incorrect oil choices can lead to premature wear, reduced fuel efficiency, and potential engine damage.
Factors to Consider
Choosing the right motor oil involves several factors. Engine type, climate, driving style, and the vehicle’s age all play a role. A high-performance engine, for example, might require a different oil type than a standard engine. Similarly, vehicles used primarily in harsh winter climates will benefit from different oil properties than those in consistently warm climates. Driving conditions, such as frequent highway driving or towing, can also impact the appropriate oil choice.
Viscosity Grades
Viscosity, a measure of a fluid’s thickness or resistance to flow, is a critical factor in oil selection. Different viscosity grades are designed for varying temperatures. A thicker oil will provide better protection at high temperatures, while a thinner oil is better for cold starts. The correct viscosity grade protects the engine components and ensures proper lubrication across different operating conditions.
| Viscosity Grade | Suitable for | Typical Temperature Range |
|---|---|---|
| 0W-20 | Cold climates, modern engines | Below freezing to moderate temperatures |
| 5W-20 | Moderate climates, modern engines | Below freezing to warm temperatures |
| 10W-30 | Mild climates, older engines | Moderate to warm temperatures |
| 15W-40 | Hot climates, older engines, towing | Warm to hot temperatures |
API and ACEA Specifications
API (American Petroleum Institute) and ACEA (Association des Constructeurs Européens d’Automobiles) specifications are crucial indicators of an oil’s quality and performance. These specifications Artikel the performance standards for different engine types. For example, an API SN oil is a newer specification designed for modern engines, whereas older engines might require an API SL specification. ACEA specifications are specifically designed for European car models, ensuring proper lubrication and performance for those vehicles.
Finding the Correct Oil Type
Locating the correct oil type for a specific car model is straightforward. Consult the owner’s manual. The manual usually specifies the exact viscosity grade and API/ACEA specifications recommended for the vehicle. Failing to adhere to the manufacturer’s recommendations can compromise engine performance and void warranties. Using an online search engine to look up the vehicle’s make, model, and year can also provide information about the correct oil type.
Gathering Necessary Supplies
Getting the right tools and materials ready is crucial for a successful and safe oil change. A well-organized approach prevents mistakes and ensures the job is completed efficiently. Proper preparation minimizes the risk of spills and ensures you have everything you need on hand.
Essential Tools and Materials
A comprehensive checklist of necessary tools and materials is essential for a smooth oil change. Having all the right tools at hand helps avoid interruptions and ensures a professional job. This includes not only the obvious tools but also safety precautions.
- Jack and jack stands
- Socket wrench set
- Oil filter wrench
- Drain pan
- Gloves
- New oil filter
- New oil
- Funnel
- Torque wrench (recommended)
- Wrench for the oil drain plug
- Rag or paper towels
- Safety glasses
Tool Functions
Understanding the function of each tool simplifies the process. This knowledge is important for correct usage and efficient execution of the oil change.
| Tool | Function |
|---|---|
| Jack and jack stands | Lifts the vehicle for access to the oil pan and filter. |
| Socket wrench set | Used for loosening and tightening various nuts and bolts. |
| Oil filter wrench | Specifically designed to remove and install oil filters. |
| Drain pan | Catches the old oil to prevent spills and environmental damage. |
| Gloves | Protects hands from oil and other potential contaminants. |
| Funnel | Facilitates the pouring of new oil into the engine. |
| Torque wrench | Ensures fasteners are tightened to the manufacturer’s specifications, preventing damage. |
| Wrench for the oil drain plug | Specifically used to remove and tighten the drain plug. |
Oil Filter Types
Different types of oil filters exist, each designed with specific characteristics. Understanding the types of oil filters helps you choose the correct one for your vehicle.
- Paper element filters are common and effective for removing contaminants from the oil. These filters are disposable and typically require replacement at scheduled intervals.
- Cartridge filters have a replaceable element and are a more efficient method for filtering oil.
- Spin-on filters are a common type, often designed for specific vehicle applications. They are typically found on passenger cars.
Measuring Oil Capacity, Oil change guide
Accurate measurement of oil capacity is essential for maintaining proper engine lubrication. Using the incorrect amount can negatively impact engine performance.
Consult your vehicle’s owner’s manual for the exact amount of oil required. Typical amounts range from 3 to 6 quarts.
The owner’s manual is the most reliable source for determining the precise oil capacity for your vehicle. Using the correct amount prevents overfilling, which can lead to potential issues.
Preparing the Vehicle
Ensuring a safe and efficient oil change process begins with properly preparing your vehicle. This involves securing the vehicle and taking necessary safety precautions to prevent accidents and ensure the safety of yourself and others. Appropriate preparation also contributes to a smoother and more controlled oil change procedure.
Securing the Vehicle
Proper vehicle positioning is crucial for a safe oil change. This involves both the safety of the individual performing the change and the avoidance of potential accidents. A stable and well-positioned vehicle minimizes risks associated with movement or slippage.
- Park the vehicle on a level surface. This prevents the vehicle from rolling, especially important for vehicles with manual transmissions, or if the vehicle is not properly supported.
- Engage the parking brake firmly. This is a fundamental safety measure to prevent accidental movement of the vehicle during the oil change process.
- Chock the wheels (if necessary). Chocks are used to prevent the vehicle from rolling. They are particularly important on inclines or if the parking brake is not sufficient.
- Lower the vehicle’s suspension (if possible). This can make access to the oil pan easier and reduce the chance of the vehicle tilting or moving unexpectedly. This is especially relevant for vehicles with adjustable suspensions.
Positioning the Vehicle
Correct positioning of the vehicle facilitates a straightforward oil change process and minimizes any potential risk. This ensures optimal access for working on the vehicle’s undercarriage without compromising safety.
- Position the vehicle on a level surface to prevent tilting or rolling.
- Ensure the vehicle is on a sturdy and stable surface. This helps avoid any accidental movement during the procedure.
- Clear the area around the vehicle to prevent obstructions or obstacles that could cause issues during the process. This also includes ensuring enough space to maneuver tools and materials.
- Place any necessary tools and materials within easy reach to streamline the process and minimize movements during the change.
Safety Precautions
Adhering to safety precautions is paramount to avoid accidents and injuries during an oil change. Proper safety measures protect both the individual performing the oil change and any bystanders.
- Wear appropriate safety glasses or goggles to protect your eyes from flying debris or potential spills.
- Use gloves to protect your hands from oil and other potential contaminants.
- Ensure the area around the vehicle is well-lit to provide adequate visibility and prevent accidents.
- Warn others of the procedure to avoid unexpected encounters near the vehicle.
- Never work under a vehicle without proper support. This is critical to avoid vehicle collapse and injury.
Vehicle Securing Procedure Illustration
| Step | Description | Image Description |
|---|---|---|
| 1 | Park on a level surface. | A vehicle parked on a level, paved area. |
| 2 | Engage the parking brake. | A close-up of the parking brake lever engaged, showing the visible lock or engagement. |
| 3 | Apply wheel chocks. | Wheel chocks firmly placed under the vehicle’s tires. |
| 4 | Verify vehicle stability. | A check to confirm the vehicle is stable and not prone to tipping. |
Draining the Old Oil
Properly draining the old oil is crucial for a safe and effective oil change. This step removes the used oil, preventing environmental contamination and ensuring the new oil can perform its function effectively. Following the correct procedure is vital to avoid potential hazards and ensure the longevity of your vehicle’s engine.
Safe Draining Procedures
Proper draining procedures minimize the risk of oil spills and ensure the used oil is disposed of safely. This involves careful handling of the oil drain pan and the oil drain plug.
Oil change guides are essential for maintaining your vehicle. Understanding the intricacies of the Automotive industry helps you appreciate the complexities involved in these procedures, from the different types of oils to the correct intervals. Ultimately, following a proper oil change guide ensures your vehicle’s longevity and performance.
Selecting the Right Oil Drain Pan
A suitable oil drain pan is essential for containing the used oil during the draining process. It should be large enough to hold the expected volume of oil from your vehicle’s engine. A sturdy pan with a lip or handle is recommended for easy transport and handling. A good example would be a heavy-duty metal pan, specifically designed for automotive use, or a large, sturdy plastic pan with a lip for containing spills.
Keeping your car running smoothly involves regular maintenance, like an oil change guide. Staying updated on the latest car news, like fuel efficiency improvements or new engine technologies, from sources like Car news can help you make informed decisions about your vehicle’s upkeep. Ultimately, following a proper oil change guide is crucial for optimal performance and longevity.
Locating and Opening the Oil Drain Plug
Identifying the oil drain plug is critical. The location varies depending on the vehicle make and model, but it’s typically located on the bottom of the engine. Consult your vehicle’s owner’s manual for precise location. Using the correct tools, such as a wrench, carefully loosen and remove the drain plug.
Preventing Oil Spills
Several measures can help prevent oil spills during the draining process. Ensure the drain pan is positioned correctly under the drain plug. Before starting the draining process, make sure the ground underneath the vehicle is clean and flat to avoid spills and make it easier to collect the oil. Slowly and carefully unscrew the plug to allow the oil to drain gradually.
Also, have a rag or absorbent material ready to wipe up any drips or spills that may occur around the drain plug area. Use caution and take care to avoid any potential spills.
Important Considerations
Using caution and proper technique is critical. Never attempt to drain oil from a vehicle that is elevated or unstable. Be sure to check for any leaks or drips before and after the draining process. It’s important to note that some vehicles have specific procedures for draining the oil. Always consult your vehicle’s owner’s manual for detailed instructions.
Replacing the Oil Filter
Replacing the oil filter is a crucial step in maintaining optimal engine performance. A properly functioning oil filter ensures that contaminants are effectively removed from the oil, preventing premature wear and tear on critical engine components. This section provides detailed instructions on safely and efficiently removing and installing a new oil filter.
Oil Filter Removal Procedure
Before starting, ensure the vehicle is securely parked on a level surface and the engine is cool. Access to the oil filter housing is generally straightforward, but specific locations may vary depending on the vehicle’s make and model. Refer to your vehicle’s owner’s manual for precise instructions and potential variations. Typically, the oil filter is located near the engine’s oil pan.
Carefully locate the filter housing and note its position relative to other engine components.
Oil Filter Replacement Steps
Correctly installing a new oil filter is vital for preventing leaks and ensuring proper oil flow. Follow these steps:
- Gather the necessary tools, including a new oil filter, a wrench suitable for the filter housing, and a new filter gasket (if applicable). Ensure the wrench is appropriate for the filter housing and will not damage it.
- Locate the oil filter housing and carefully apply a small amount of new oil to the rubber gasket of the new oil filter. This helps with sealing and ensures proper installation.
- Using the appropriate wrench, carefully loosen the old oil filter, turning it counterclockwise. Be cautious not to over-tighten the filter or apply excessive force, which may damage the filter or the housing.
- Remove the old oil filter once it is loosened. Be prepared to catch any remaining oil that might drain from the filter.
- Inspect the old oil filter for any unusual damage or wear. Visual inspection can provide valuable insights into the condition of the engine’s oil filtering system.
- Carefully align the new oil filter with the housing, ensuring the gasket is properly seated. A new gasket is essential for a leak-free installation and is usually included with the new filter.
- Tighten the new oil filter by hand initially, then use the wrench to tighten it to the manufacturer’s specifications. Over-tightening can damage the filter housing, so avoid excessive force. Consult your vehicle’s manual for the recommended tightening torque.
- After tightening, double-check the filter for any signs of leaks. A slight drip is normal but excessive leakage indicates a problem with the filter installation or gasket.
Importance of the Oil Filter Gasket
The oil filter gasket is a critical component for a leak-free installation. A damaged or worn gasket can result in oil leaks, which can lead to environmental concerns and damage to the engine. Using a new gasket ensures a proper seal, preventing oil from escaping. It is imperative to use the appropriate gasket specified by the manufacturer, as improper gaskets can compromise the sealing integrity of the filter.
Common Oil Filter Types
Different vehicles utilize various oil filter types. The most common types are cartridge filters, spin-on filters, and some specialized designs.
- Cartridge filters are often used in older vehicles or specific applications. They typically involve a replaceable cartridge containing the filtering media. The design of cartridge filters allows for easy replacement of the filter element.
- Spin-on filters are widely used in modern vehicles. They are attached directly to the oil filter housing and tightened using a wrench. Spin-on filters offer a convenient and efficient way to replace the oil filter.
- Specialized designs are sometimes employed in high-performance or specific vehicle types. These filters often have unique features, such as enhanced filtering capabilities or a specialized mounting design, tailored to the demands of the specific application.
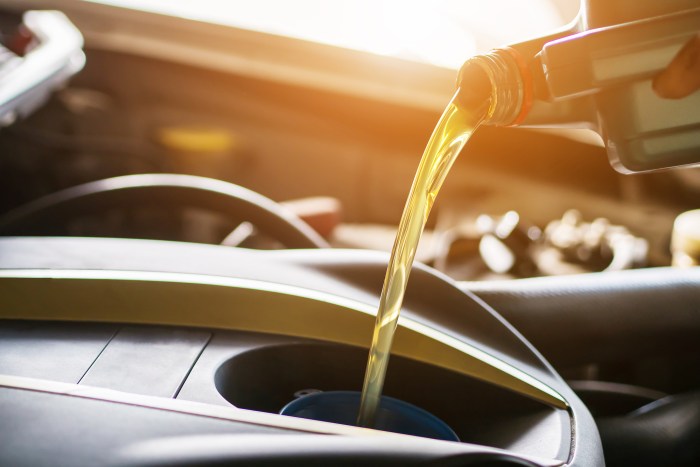
Adding New Oil: Oil Change Guide
Adding the fresh oil to your engine is a crucial step in the oil change process. Incorrect procedures can lead to potential damage, so careful attention to detail is essential. Following the manufacturer’s recommendations and proper techniques ensures optimal engine performance and longevity.The correct amount of oil is vital for proper lubrication. Overfilling can cause issues with the engine’s seals and components, while underfilling compromises the lubricating function.
Always consult your vehicle’s owner’s manual for the precise amount of oil recommended for your specific model.
Pouring the New Oil
Properly pouring the new oil is key to avoiding spills and ensuring the correct amount is added. Use a funnel to guide the oil into the engine’s oil filler cap, avoiding splashing or dripping onto other engine components.
Checking the Oil Level
Accurately determining the oil level is critical for maintaining optimal engine lubrication. Incorrect levels can lead to engine damage, highlighting the importance of this step.
Using a Dipstick to Check Oil Level
A dipstick is a simple yet effective tool for checking the oil level. It provides a direct visual representation of the oil’s position within the engine.
- Locate the dipstick, typically located on the engine’s side or under the engine cover.
- Wipe the dipstick clean with a rag or paper towel to remove any old oil.
- Insert the dipstick fully into the oil filler hole, and remove it.
- Observe the oil level on the dipstick. The oil level should be between the minimum and maximum marks. This is crucial for maintaining optimal lubrication.
Identifying Low Oil Levels and Addressing Them
A low oil level can indicate a leak or insufficient oil, requiring immediate attention.
- If the oil level is below the minimum mark, carefully add the correct amount of oil, as specified in your owner’s manual. Using a funnel, add the oil slowly and cautiously to prevent overfilling.
- If the oil level is consistently low, further investigation is needed to identify the source of the leak. A leak could be due to a faulty gasket or seal, requiring professional inspection and repair.
Final Checks and Disposal
Completing an oil change involves more than just the physical act of replacing fluids. Properly disposing of used oil and performing final checks ensures the safety and longevity of your vehicle and protects the environment. This section details the critical steps for a thorough and responsible oil change procedure.
Final Checks Before Driving
After completing the oil change process, a series of checks are essential to guarantee the vehicle’s operational safety and to confirm that the procedure was executed correctly. These checks minimize potential issues that might arise from improper procedures or missed steps. Ensuring the oil level is correct and that the oil filter is properly secured are paramount.
- Verify the oil level. The oil level should be within the designated range marked on the dipstick. This is crucial to ensure sufficient lubrication for the engine’s components.
- Inspect the oil filter for proper installation. A correctly tightened filter prevents leaks and ensures effective oil filtration.
- Examine the area around the oil pan and filter for any leaks. Spotting leaks early allows for prompt repairs and avoids potential environmental hazards.
- Confirm that the drain plug is securely tightened. A loose drain plug can lead to oil leakage, causing significant damage to the vehicle and environmental pollution.
Proper Disposal Methods for Used Oil
Improper disposal of used motor oil poses significant environmental risks. Used oil contains harmful contaminants and must be handled with care to protect the environment. Local regulations dictate how used oil should be disposed of. Never pour used oil down drains, onto the ground, or into storm drains.
- Locate a designated oil recycling facility. These facilities are equipped to handle used oil safely and environmentally responsibly. They have the appropriate procedures for recycling and disposing of oil, often separating it from other contaminants.
- Check local regulations regarding oil disposal. Specific guidelines and regulations vary by region. Familiarizing yourself with local ordinances will ensure that you are adhering to proper disposal procedures.
- Avoid mixing used oil with other materials. Contamination can hinder recycling and increase the environmental burden.
- Use appropriate containers for transporting used oil. Using a designated container prevents spills and leakage during transportation.
Local Recycling Facilities for Used Oil
Recycling used oil is a crucial aspect of environmental stewardship. Finding a local facility for oil disposal is crucial for responsible oil changes. This table provides a sample of potential recycling locations. Actual locations and hours of operation will vary. Always confirm details with the facility directly.
| Facility Name | Address | Phone Number | Hours of Operation |
|---|---|---|---|
| [Local Recycling Facility 1] | [Address] | [Phone Number] | [Hours] |
| [Local Recycling Facility 2] | [Address] | [Phone Number] | [Hours] |
| [Local Recycling Facility 3] | [Address] | [Phone Number] | [Hours] |
Environmental Impact of Improper Oil Disposal
Improper oil disposal significantly harms the environment. Oil spills contaminate soil and water sources, harming wildlife and ecosystems. The pollutants in used oil can persist in the environment for extended periods, leading to long-term damage. Significant fines and penalties can be imposed for improper disposal of used oil.
Improper oil disposal can lead to significant environmental damage, affecting water sources, soil quality, and wildlife habitats.
Troubleshooting Common Issues
Oil changes, while generally straightforward, can occasionally present unexpected challenges. Understanding potential problems and how to address them is crucial for maintaining vehicle health and avoiding costly repairs. This section details common issues and their solutions, empowering you to confidently tackle any hiccups that may arise.
Potential Oil Change Problems
Troubleshooting potential problems during an oil change involves identifying the source of any issues encountered. Common problems include leaks, incorrect oil quantity, and filter issues. Careful attention to detail and methodical investigation can often prevent significant problems.
Oil Leaks
Oil leaks are a common issue during and after an oil change. Leaks can stem from various sources, including a loose drain plug, a damaged gasket, or a faulty oil filter housing. Identifying the source of the leak is essential for effective repair.
- Loose Drain Plug: Tightening the drain plug is a simple but critical step. Over-tightening can damage the plug or threads, but under-tightening can lead to leaks. Ensure the plug is snug, but not excessively tight.
- Damaged Gasket: A damaged oil pan gasket or oil filter gasket is another potential source of leaks. Replacing these components with new OEM parts is essential to prevent further issues. Inspect the gaskets for any signs of damage or deterioration before installation.
- Faulty Oil Filter Housing: The oil filter housing may develop a leak over time, particularly if the filter is improperly installed or the housing is damaged. Replacing the housing or tightening the filter housing mounting bolts can resolve the issue. Ensure proper torque specifications are followed when tightening the bolts.
Incorrect Oil Quantity
Adding the correct amount of oil is critical for optimal engine performance. Adding too much oil can lead to issues like overfilling and potentially damaging the engine. Adding too little can result in insufficient lubrication, leading to engine wear and tear.
- Overfilling: Check the dipstick frequently during the oil addition process. Remove excess oil with a rag or funnel. Following the vehicle’s owner’s manual is crucial to ensure proper oil levels.
- Underfilling: Add oil to the correct level according to the vehicle’s owner’s manual. Using the dipstick, check the oil level periodically. Add more oil only if necessary.
Oil Filter Issues
Oil filter problems are also potential sources of leaks or other issues. An improperly installed or damaged filter can lead to leaks and reduced oil flow.
- Improper Installation: Ensure the oil filter is installed correctly. Use the correct installation torque, following the vehicle’s owner’s manual. Never force the filter.
- Damaged Filter: Inspect the filter for any signs of damage or leaks. Replacing a damaged filter with a new one is vital to ensure optimal performance.
Troubleshooting Table
| Problem | Possible Cause | Solution |
|---|---|---|
| Oil Leak | Loose drain plug, damaged gasket, faulty housing | Tighten drain plug, replace gasket, replace housing |
| Incorrect Oil Level | Overfilling, underfilling | Remove excess oil, add oil to correct level |
| Filter Issues | Improper installation, damaged filter | Correctly install filter, replace damaged filter |
Maintenance Tips
Proper oil maintenance is crucial for maximizing your vehicle’s lifespan and performance. Consistent care, beyond simply changing the oil, plays a vital role in preventing costly repairs and ensuring a smooth driving experience. This section provides valuable insights into extending the life of your engine and maintaining a healthy oil change schedule.Regular upkeep of your engine’s oil system, including scheduled changes, directly impacts its overall health.
Ignoring these maintenance procedures can lead to premature wear and tear, potentially requiring costly repairs down the line. Proactive maintenance is a cost-effective strategy for minimizing future problems.
Extending Oil Life
Maintaining optimal oil condition is key to extending its life. This involves not only the change intervals but also driving habits and environmental factors. High-quality oil and proper storage contribute significantly to extended service life.
- Use high-quality oil recommended by your vehicle manufacturer. This ensures optimal lubrication and protection against wear and tear, potentially extending the oil’s life by several thousand miles.
- Avoid frequent short trips. Short trips often fail to heat the oil adequately, leading to premature oxidation. Extended driving allows the oil to circulate and maintain its lubricating properties.
- Park in shaded areas whenever possible. Excessive heat accelerates oil degradation, reducing its effectiveness. Parking in shaded areas helps to maintain oil quality.
- Store oil properly when not in use. Proper storage, including airtight containers, helps to prevent contamination and oxidation, preserving its quality.
Engine Maintenance Frequency
The frequency of oil changes varies depending on driving conditions. Aggressive driving, frequent stop-and-go traffic, and extreme temperatures all necessitate more frequent changes. A detailed understanding of your driving habits is critical for determining the appropriate interval.
| Driving Condition | Frequency Recommendation | Explanation |
|---|---|---|
| City driving (stop-and-go traffic, frequent acceleration/deceleration) | Every 3,000 to 5,000 miles | Frequent starts and stops, and high temperatures, can cause rapid oil degradation. |
| Highway driving (steady speeds) | Every 5,000 to 7,000 miles | Steady speeds and less frequent temperature fluctuations allow the oil to maintain its properties for a longer period. |
| Heavy-duty use (towing, off-roading) | Every 2,500 to 3,500 miles | Heavy use generates more friction and heat, demanding more frequent oil changes to prevent engine damage. |
| Harsh environmental conditions (extreme heat/cold) | Every 2,000 to 4,000 miles | Extreme temperatures significantly affect oil viscosity and performance. Frequent changes help maintain optimal lubrication. |
Preventing Future Problems
Proper engine maintenance significantly reduces the risk of costly repairs. Ignoring scheduled oil changes can lead to serious issues like engine damage, reduced performance, and costly repairs.
- Adhering to the recommended oil change schedule is a preventative measure. This helps to keep the engine running smoothly and efficiently.
- Monitoring oil levels regularly. Low oil levels can lead to overheating and engine damage. Checking oil levels helps maintain the proper lubrication of engine components.
- Addressing warning lights promptly. Ignoring warning lights, like low oil pressure, can quickly escalate into significant mechanical problems.
Maintaining the Oil Change Schedule
Developing a consistent oil change schedule and sticking to it is vital for preserving engine health. This involves setting reminders, using a calendar, or employing mobile apps. A regular schedule minimizes the risk of costly repairs and extends the engine’s lifespan.
- Create a reminder system for yourself. This could be a calendar entry, a sticky note, or an app notification. This helps to stay on top of your maintenance schedule.
- Maintain a detailed log of oil changes, noting the mileage, date, and any unusual circumstances. This provides a clear record of maintenance history for future reference.
- Avoid delaying oil changes. Delayed changes can lead to significant engine wear and tear, which can lead to costly repairs.
Closing Summary

In conclusion, this oil change guide provides a practical and informative resource for maintaining your vehicle’s engine. By following the detailed steps, you can perform oil changes confidently, preventing potential engine damage and extending its lifespan. Remember to prioritize safety and proper disposal methods. Regular maintenance is crucial, and this guide is your ultimate resource to stay ahead of potential issues.
FAQ Corner
What’s the ideal oil change interval for my car?
The recommended interval varies based on your vehicle’s make and model, driving conditions, and the type of oil used. Always consult your vehicle’s owner’s manual for specific recommendations.
What are the signs that my oil needs changing soon?
Low oil levels, unusual noises from the engine, and the presence of black or dark-colored oil are potential indicators that an oil change is needed. Pay close attention to your vehicle’s performance and consult your owner’s manual for more details.
What are the environmental consequences of improper oil disposal?
Improper disposal can contaminate soil and water sources. Adhering to local regulations and using designated recycling facilities is essential for environmental protection.
What should I do if I notice a leak during the oil change process?
Stop immediately, and carefully inspect the area for the source of the leak. Consult your owner’s manual for specific troubleshooting steps. If the leak is significant, seek professional assistance.


